 |
Department of Physics | AstroLab |
Astrometrica: A Brief Tutorial
Reference: "The Handbook of Astronomical Image Processing" by Richard Berry and James Burnell, pub. William-Bell Inc. can be found in the AstroLab and in the library. Chapter 7 should be consulted to understand the theory behind Astrometrica
Astrometry is working out how the x-y position of an object on a CCD image transforms to Right Ascension (RA) and Declination (Dec) on the sky. By measuring accurately the positions of (fixed) stars in the frame, you can calculate the position (in RA and Dec) of the object you are interested in. Astrometrica does just this - the position of you object is measured relative to the stars. However, you first need to work out where the stars are!
There are a lot of tutorials and documentation in the 'Help'. You may like to look at the built-in tutorial before trying the rest of this example. Load Astrometrica, then load the image stored in: "C:\Program Files\Astrometrica\Tutorials\2000AC6_1.st6" The tutorial can be found in the online 'Help > Help Contents' menu-bar.
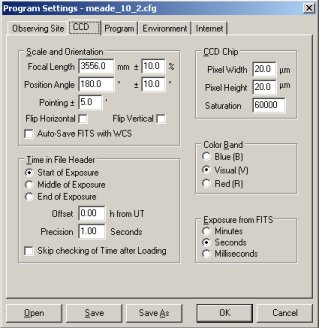
Before starting any astrometry, it is vital to ensure the astrometry settings, found by clicking "File > Settings", are correct for the observatory location and telescope in question!. The default location is usually set correctly for Durham, and the correct settings for one of the the Astrolab telescopes willbe be entered for the focal length and CCD position angle. Every time you use Astrometrica, make sure the settings are right for your telescope.
The tutorial images are supplied with Astrometrica, and taken with a telescope of ~1800mm focal length, equipped with a CCD of 0 degree position angle. The tutorial images are also horizontally flipped. If you do not alter the focal length (the Astrolab telescopes all have considerably longer focal lengths), set the position angle to 0 degrees (remember some of the Astrolab CCDs are at position angles of 180 degrees to accomodate the cabling), and check the "Flip Horizonal" check box in the "File > Settings > CCD" tab, you will not acquire an astrometric position! Be sure to check also that the pixel size is correct for an ST6 CCD, with a pixel width of 23um x 27um.
To find your objects, you may use the object finder from ASTFINDER or the Minor Planet Center for the observation of the object you are interested in. Alternatively, if you prefer, you may print a chart of the viewable field from within Earth Centered Universe. Check that the time stamp on your observation is roughly the same as the finder you are using, otherwise there may be no identifiable stars.
Here, we'll outline our own tutorial using a different image, taken locally. Load the CCD frame "archive\14\2007\07_11_02\cw_cas_seq_025.ST9" from the 14-inch telescope archive into Astrometrica. This image of CW_Cas, an eclipsing binary star, was taken on the 2nd November 2007 at 18:37. The star is slightly above and left of the image centre - the large star highlighted by the red box in the image below.
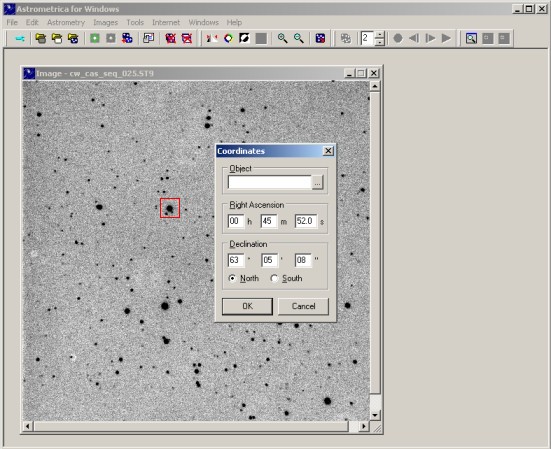
Astrometrica will first ask you to confirm the time and date stamp in the image header; in this example the stamp is accurate, and will in nearly all cases be so. Before proceeding further, enter the correct settings for the 14" telescope by clicking on "File > Settings." Under the "Observing Site" tab, enter the following parameters:
- Longitude: 1.5730 degrees West
- Latitude: 54.7690 degrees North
- Height: 75m
To fit the astrometry, click 'Astrometry > Data Reduction' from the title bar. Astrometrica needs to know where the telescope was pointing at the time of the observation; it can be given this information in one of two ways. If the object of interest is contained within Astrometrica's database, you can enter its name into the dialogue box that should now have appeared. If the object is not in the database, you can enter the object's RA and Dec directly in the same dialogue box. To obtain these figures, use the finder tools (ASTFINDER or MPC). Note that Astrometrica ideally requires the RA and Dec of the centre of the CCD frame, so you will acquire better accuracy if your target is centred in your images. In this example the object is close enough to the centre of the frame, so we enter an RA of 00:45:52.7, and a Dec of 63:05:08 (north).
Once you click OK, Astrometrica will attempt to find the brightest stars in the frame, and match them with known stars in a bright star catalogue. As with the Astrometrica tutorial, if the default settings used for the astrometry aren't matched to the telescope used for the imaging, the astrometry might be inaccurate or unsucessful. Note that these settings may well be incorrect, since the Astrolab has four telescopes of varying focal length and CCD position angle. The key point is to always check your settings by clicking on "File > Settings". If the astrometry isn't accurate, Astrometrica will assume the astrometry settings are incorrect, and will open a dialogue box asking you to enter the correct settings for:
Magnitude - default 17 (magnitude limit of the reference stars to look up).
Focal Length - select from the table at the bottom of the page.Position angle - angle of the CCD with respect to the stars, select from the table at the bottom of the page.
Once these parameters have been entered, Astrometrica will overlay the reference stars in the field of view. The reference stars may or may not be quite in the right place; if the positions are exact, the matched stars will be contained within green circles. If the astrometry isn't exact, you should see the same star patterns in the red circles as you see on the CCD frame, but slightly offset.
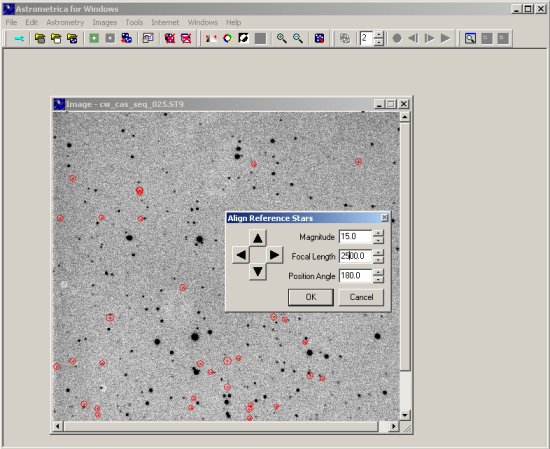
The image above shows the result if an incorrect focal length is used with our tutorial image. It is easy to move the circles to the correct position by using the arrows in the 'Align Reference Stars' window. You may not be able to align all of the stars in the CCD frame with the reference stars perfectly, but Astrometrica can cope with this - just get them as close as possible!
Once they're roughly aligned, click 'OK' and Astrometrica will attempt to fit all of the positions and calculate the x-y to RA-Dec mapping. The solution will be indicated by the green circles overlaid on the stars.
Reference Stars that were used for the astrometric data reduction are circled green. 'Bad' reference stars that were rejected due to large residuals are marked by yellow circles. Stars (i.e., objects that were found at the same position in at least two images) are circled blue.
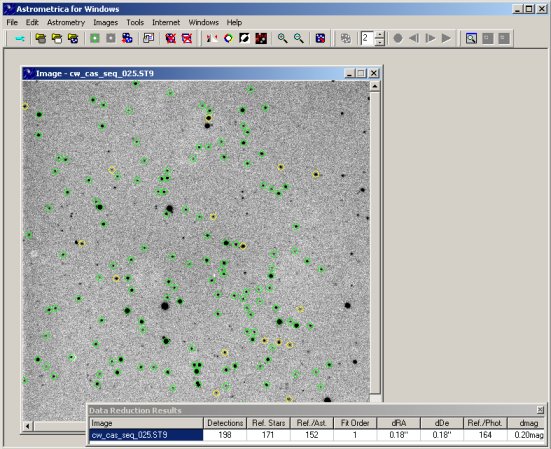
The rms fit of the stars is indicated by the dRA and dDec in the 'Data Reduction Details' window at the bottom of the screen. Check that this number isn't too big. The seeing in Durham is about 6". Typical values of DRa and DDec are less than 1".
As long as your target is bright, measuring the position of your object is now easy: simply click on what you think is your target and an 'Object Verification' window showing the measured right ascension and declination will appear. This works by trying to fit a gaussian to the object, shown by the red curve overplotted on top of the object (the white points). The quality of the fit is shown by the residuals underneath this plot. Evidently, in the example below the object is extremely well detected - the S/N is >150 and can be clearly seen. Clicking on 'Object Designation' will give the parameters for the fit to the object. If you are happy with it then click 'Accept' and this will add the object and it's parameters to the MPC Report. Each time you open Astrometrica it will ask you if you want to overwrite the MPC report. It is these reports which you feed into 'find_orb' to find the orbital parameters. You will need a different MPC report for each asteroid if you are doing main belt asteroids so you will have to rename them for each object.
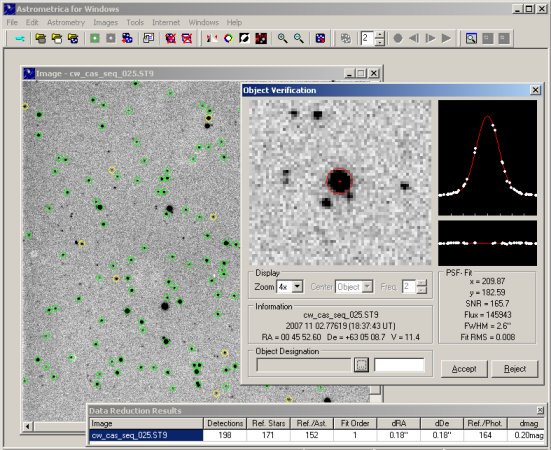
Tips: What is the signal-to-noise of the your object? Is there enough signal in your object to get an accurate position, or have you just selected a region of noisy sky? As a rule of thumb, if the signal-to-noise is greater than ~5, then you've probably selected the object, if the signal-to-noise is less than 5, you probably want to make a note saying that this may not actually be the correct position. If you have several frames of the same object taken at the same time, try stacking them - this will make the object brighter and the position measurement much better. You can align and stack frames by clicking on the 'Astrometry > Track & Stack' menu option. Add the frames you have into the list and Astrometrica will align and stack them. The data reduction is much the same as above.
Common Problems
The most common problem is when the parameters for the astrometry solution is not set up correctly. These paramters can be found under 'File > Settings' menu option. The parameters which are usually affected are in the 'CCD' tab which defines how Astrometrica tries to i) find stars, and ii) work out how the pixel scale on the CCD.
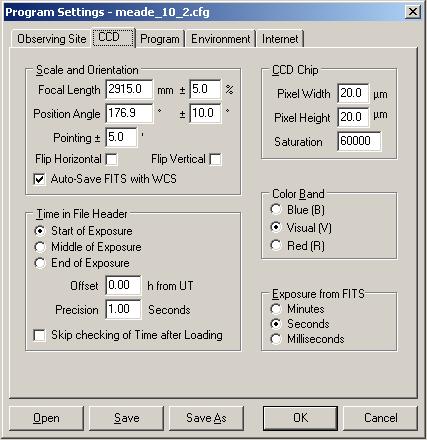
Settings - CCD
Focal Length The focal length of the telescope and pixel width are used to calculate the CCD plate scale (in arcsec/pixel) on the CCD. This is used when overlaying and fitting the UCAC4 or USNOB-1.0 star catalogue. The tolerance in this value can also be specified. Note that a lower tolerance will cause the fitting to be faster, but may fail if either the focal length or pixel width is incorrect.
Position Angle The position angle (PA) of the CCD with respect to the field of view (North and East) in the night sky. The PA for each of the CCD--telescope combinations is given in a table at the bottom of this page.
Pointing The allowed accuracy of the pointing of the telescope compared to the central position enetered during the first process of the data reduction. This is used when trying to pattern match the stars. Note the field of view of the CCD is aprox. 12arcmins.
CCD Chip The pixel height and width can be found in the table at the bottom of this page. These are used with the focal length to calculate the CCD plate scale. The saturation is used for detecting objects which have saturated the CCD. These will be excluded from the fit as they may have bled and cause spurious positions to arise for bright stars. A value of 2^15 us usually the maximum that can be held by a any pixel. If a star causes more counts than this, the pixel 'spills' (or bleeds) counts into surrounding pixels.
Time In File Header Ensure the "Start of Exposure" box is checked, since this is the time that is stamped into the FITS header. Leave the offset from Universal Time set to zero, and the precision at 1.00 secs. The colour band should be set to the V band.
Checks if the reference stars can't be matched to the observed stars
1 - Is the focal length correct?
The focal length (in millimeters), and the possible variation from the nominal value (in percent). The telescopes have slightly different focal lengths. The variation allowed for the focal length to compensate for these effects should be set as small as possible (though as large as needed). This will increase the efficiency and reliability of the reference star match. Note that the fitting may be faster if the %'s are smaller, although it may be less accurate
2 - Is the size of the pixels correct?
Enter the width and height of the CCD pixels. The focal length and CCD pixel size define the plate scale (arcseconds per pixel).
3 - Is the image flipped or rotated compared to your finding chart?
This defines the orientation of the image (measured in degrees) with respect to the stars. The orientation is specified by the position angle: "North up" corresponds to a position angle of 0\B0 and "South up" to 180\B0.
Table of Parameters for each telescope (as of October 2013)
These parameters are approximate only, and may need tuning up in Astrometrica for optimal results.
| Focal Length (mm) | Pixel Width (microns) | Plate scale (arcsec / pixel) | Position Angle (degrees) | |
| 12"+ QSI 583ws West Dome |
~3500 | 16.2 x 16.2 | 1.02 x 1.02 | ~180 |
| 14"+QSI 583ws East Dome |
3208 | 16.2 x 16.2 | 0.98 x 0.98 | 177.3 |
| 14"+ST9-XE Far East Dome |
3556 | 20 x 20 | 1.20 x 1.20 | ~180 |
| DRACO2 14"+SBIG ST9 DRACO2 Dome |
3208 | 10.5 x 10.5 | 1.24 x 1.24 | ~180 |
| 10"(1)+ST9-XE Decommissioned | 2600 | 20 x 20 | 1.4 x 1.4 | 180 |
| 10"(2)+ST9-XE Decommissioned | 2915 | 20 x 20 | 1.4 x 1.4 | 179.5 |
| DRACO 10"+ST9 Decommissioned |
2618 | 20 x 20 | 1.58 x 1.58 | 181.5 |
| 12"+ST9-XE Decommissioned |
~3500 | 20 x 20 | 1.28 x 1.28 | ~180 |
Programme Settings
The 'Program' tab in the 'Settings' menu defines options for object detection and reference star matching. For every telescope, these setting can differ. It is important to understand what these settings do and why they are important. You should alter them and find the best combination for your data. Why are the settings you use the best settings?
The program settings are described in detail in the Astrometrica Online Help, and can also be found on this page
The USNO-B1.0 catalogue provides a good surface density of stars.
The Hyades
The Hyades project involves measuring the position of a bright star with a high proper motion which appears in the star catalogue. This star should not be included in the astrometry fit. To exclude this object, set the 'upper limit' magnitude in the 'Program' tab of the 'Settings' menu to only fit stars brighter than your target and therefore cut out this star.
A.M.Swinbank 19/03/2004 - updated by R.A.Crain 17/03/2005, T.D.Rawle 23/11/2006,05/02/2008, A.L.R. Danielson 25/11/2010, G.B.Lansbury 18/10/2013| Back to the AstroLab Home Page | jrl | 2020-Jun-17 13:49:03 UTC |